Herriott Grace

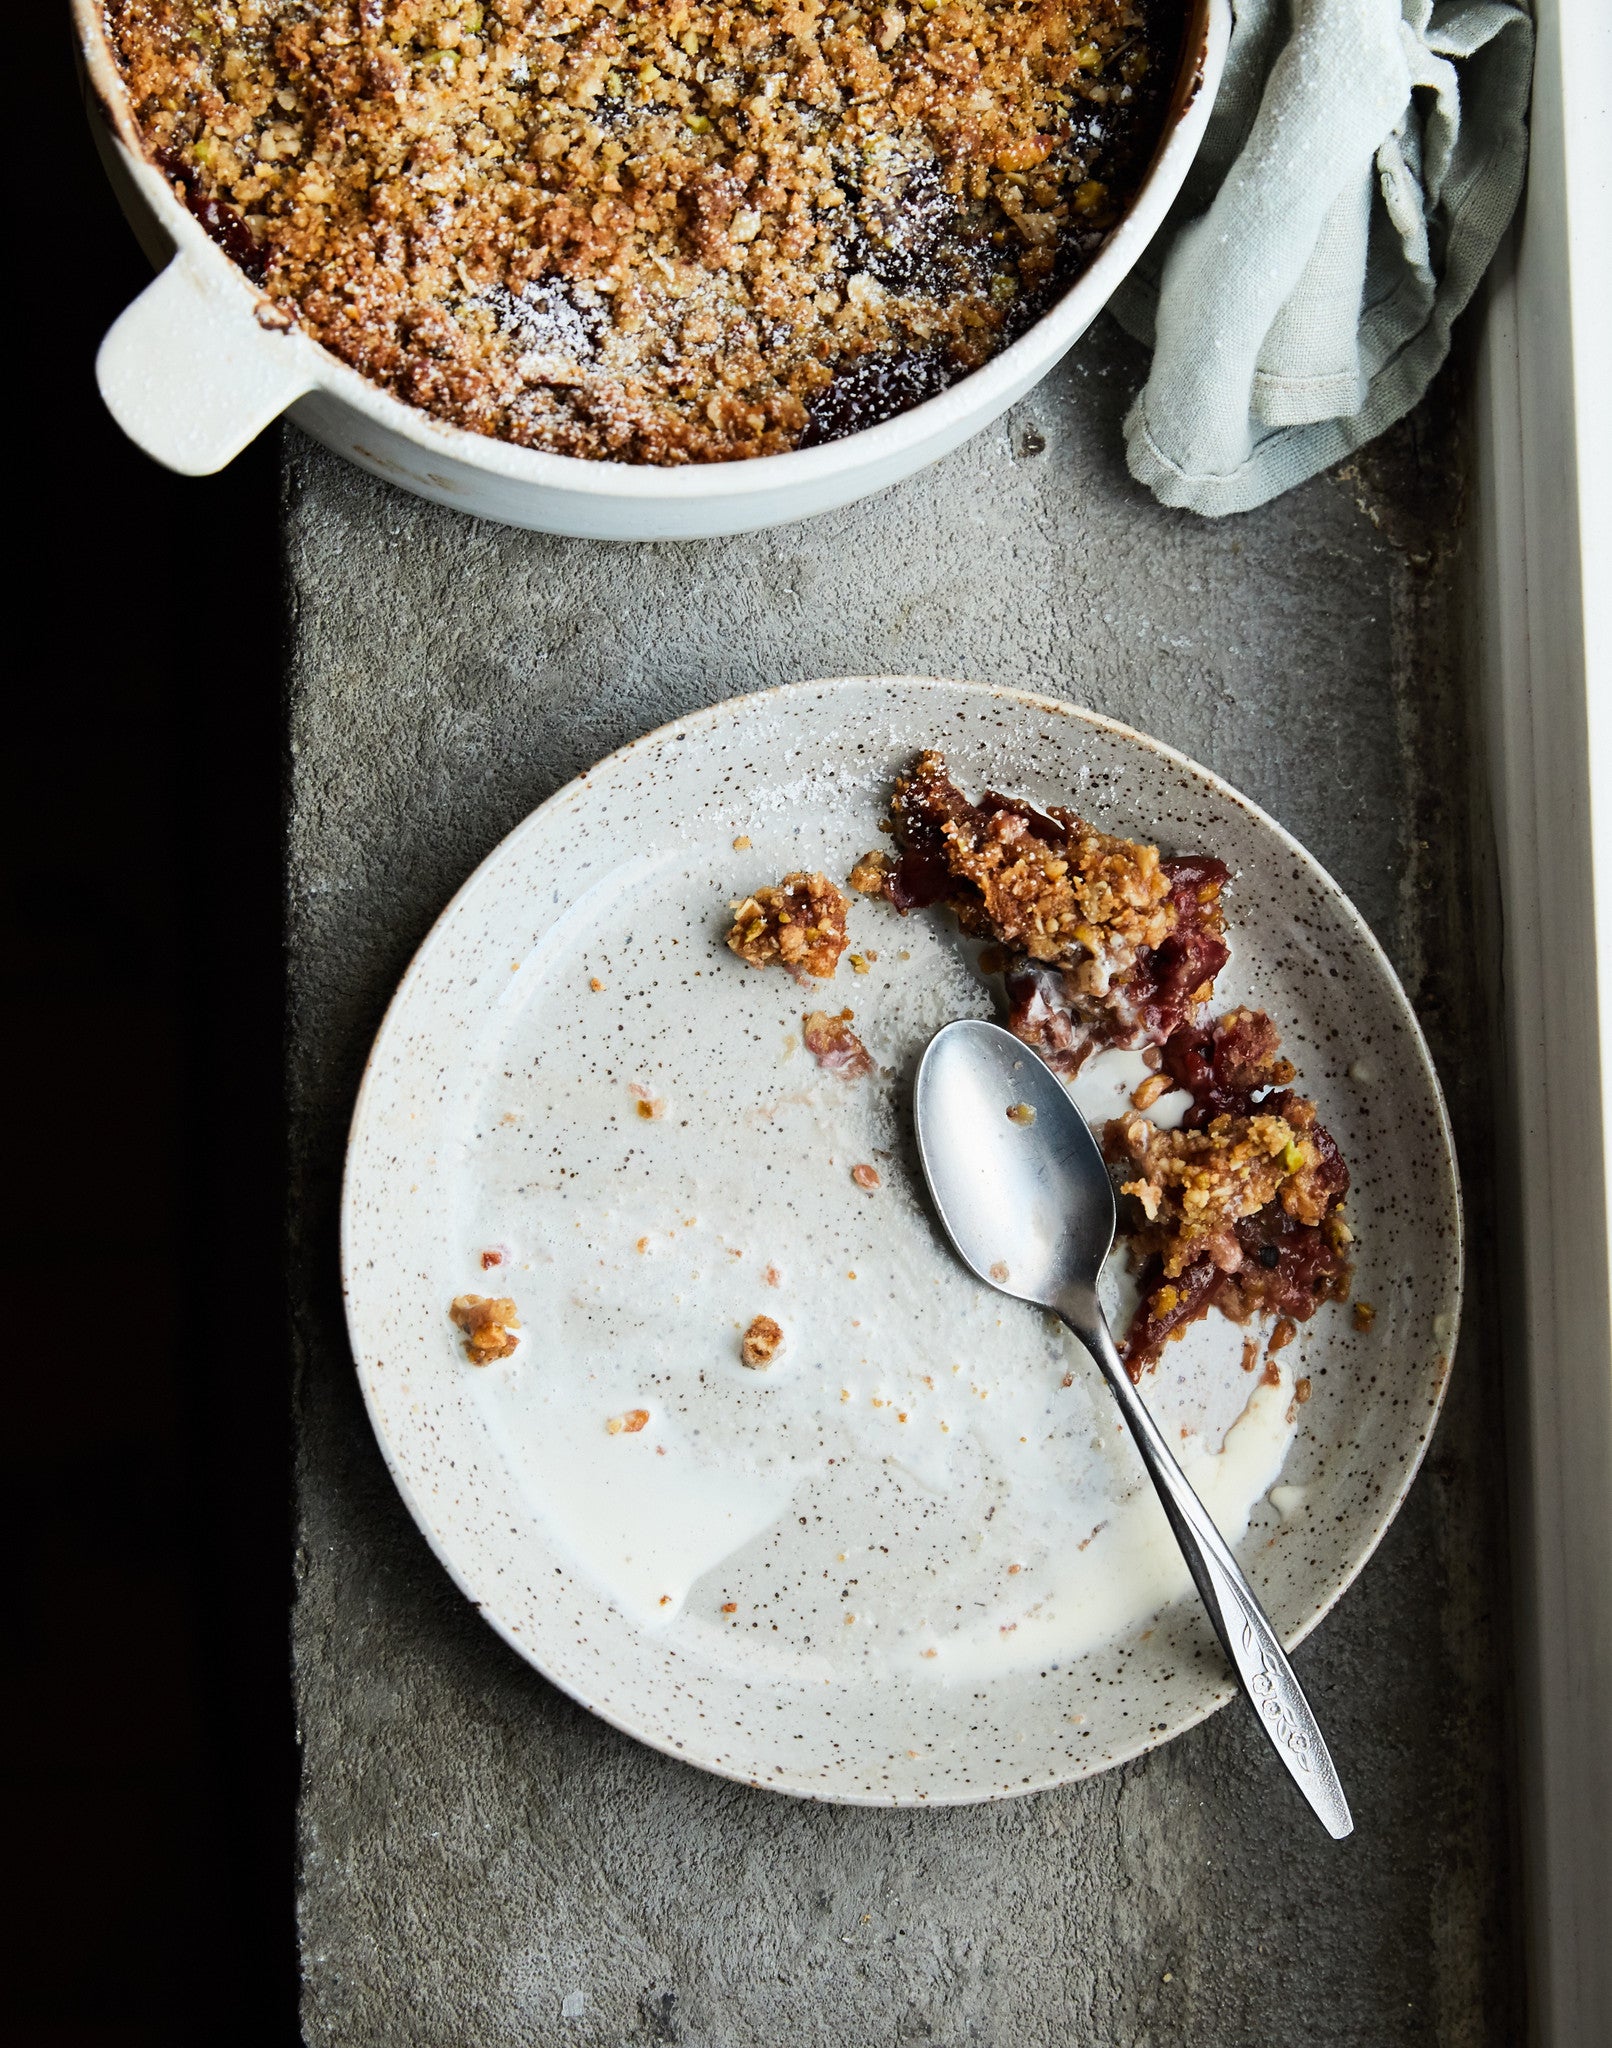
Perhaps the most perfect crumble we've ever made + the first in a recipe collaboration with Tara O'Brady & me. Almond paste, natural almonds and the rhubarb and strawberries of early summer (what could be better?!). Even if you hate marzipan, I urge you to try it anyway, it delicious and well worth the extra step! 
xo, N


Herriott Grace 

From the HG Shop:

Medium & Large Casseroles
Yellow Cedar Serving Spoon
White Porcelain Bowls
Stoneware + Porcelain Salt Bowl
White Porcelain Side Plate
Porcelain Mixing Bowls
Sugar + Flour Scoops
Light Blue Earthenware Bowl


Herriott Grace


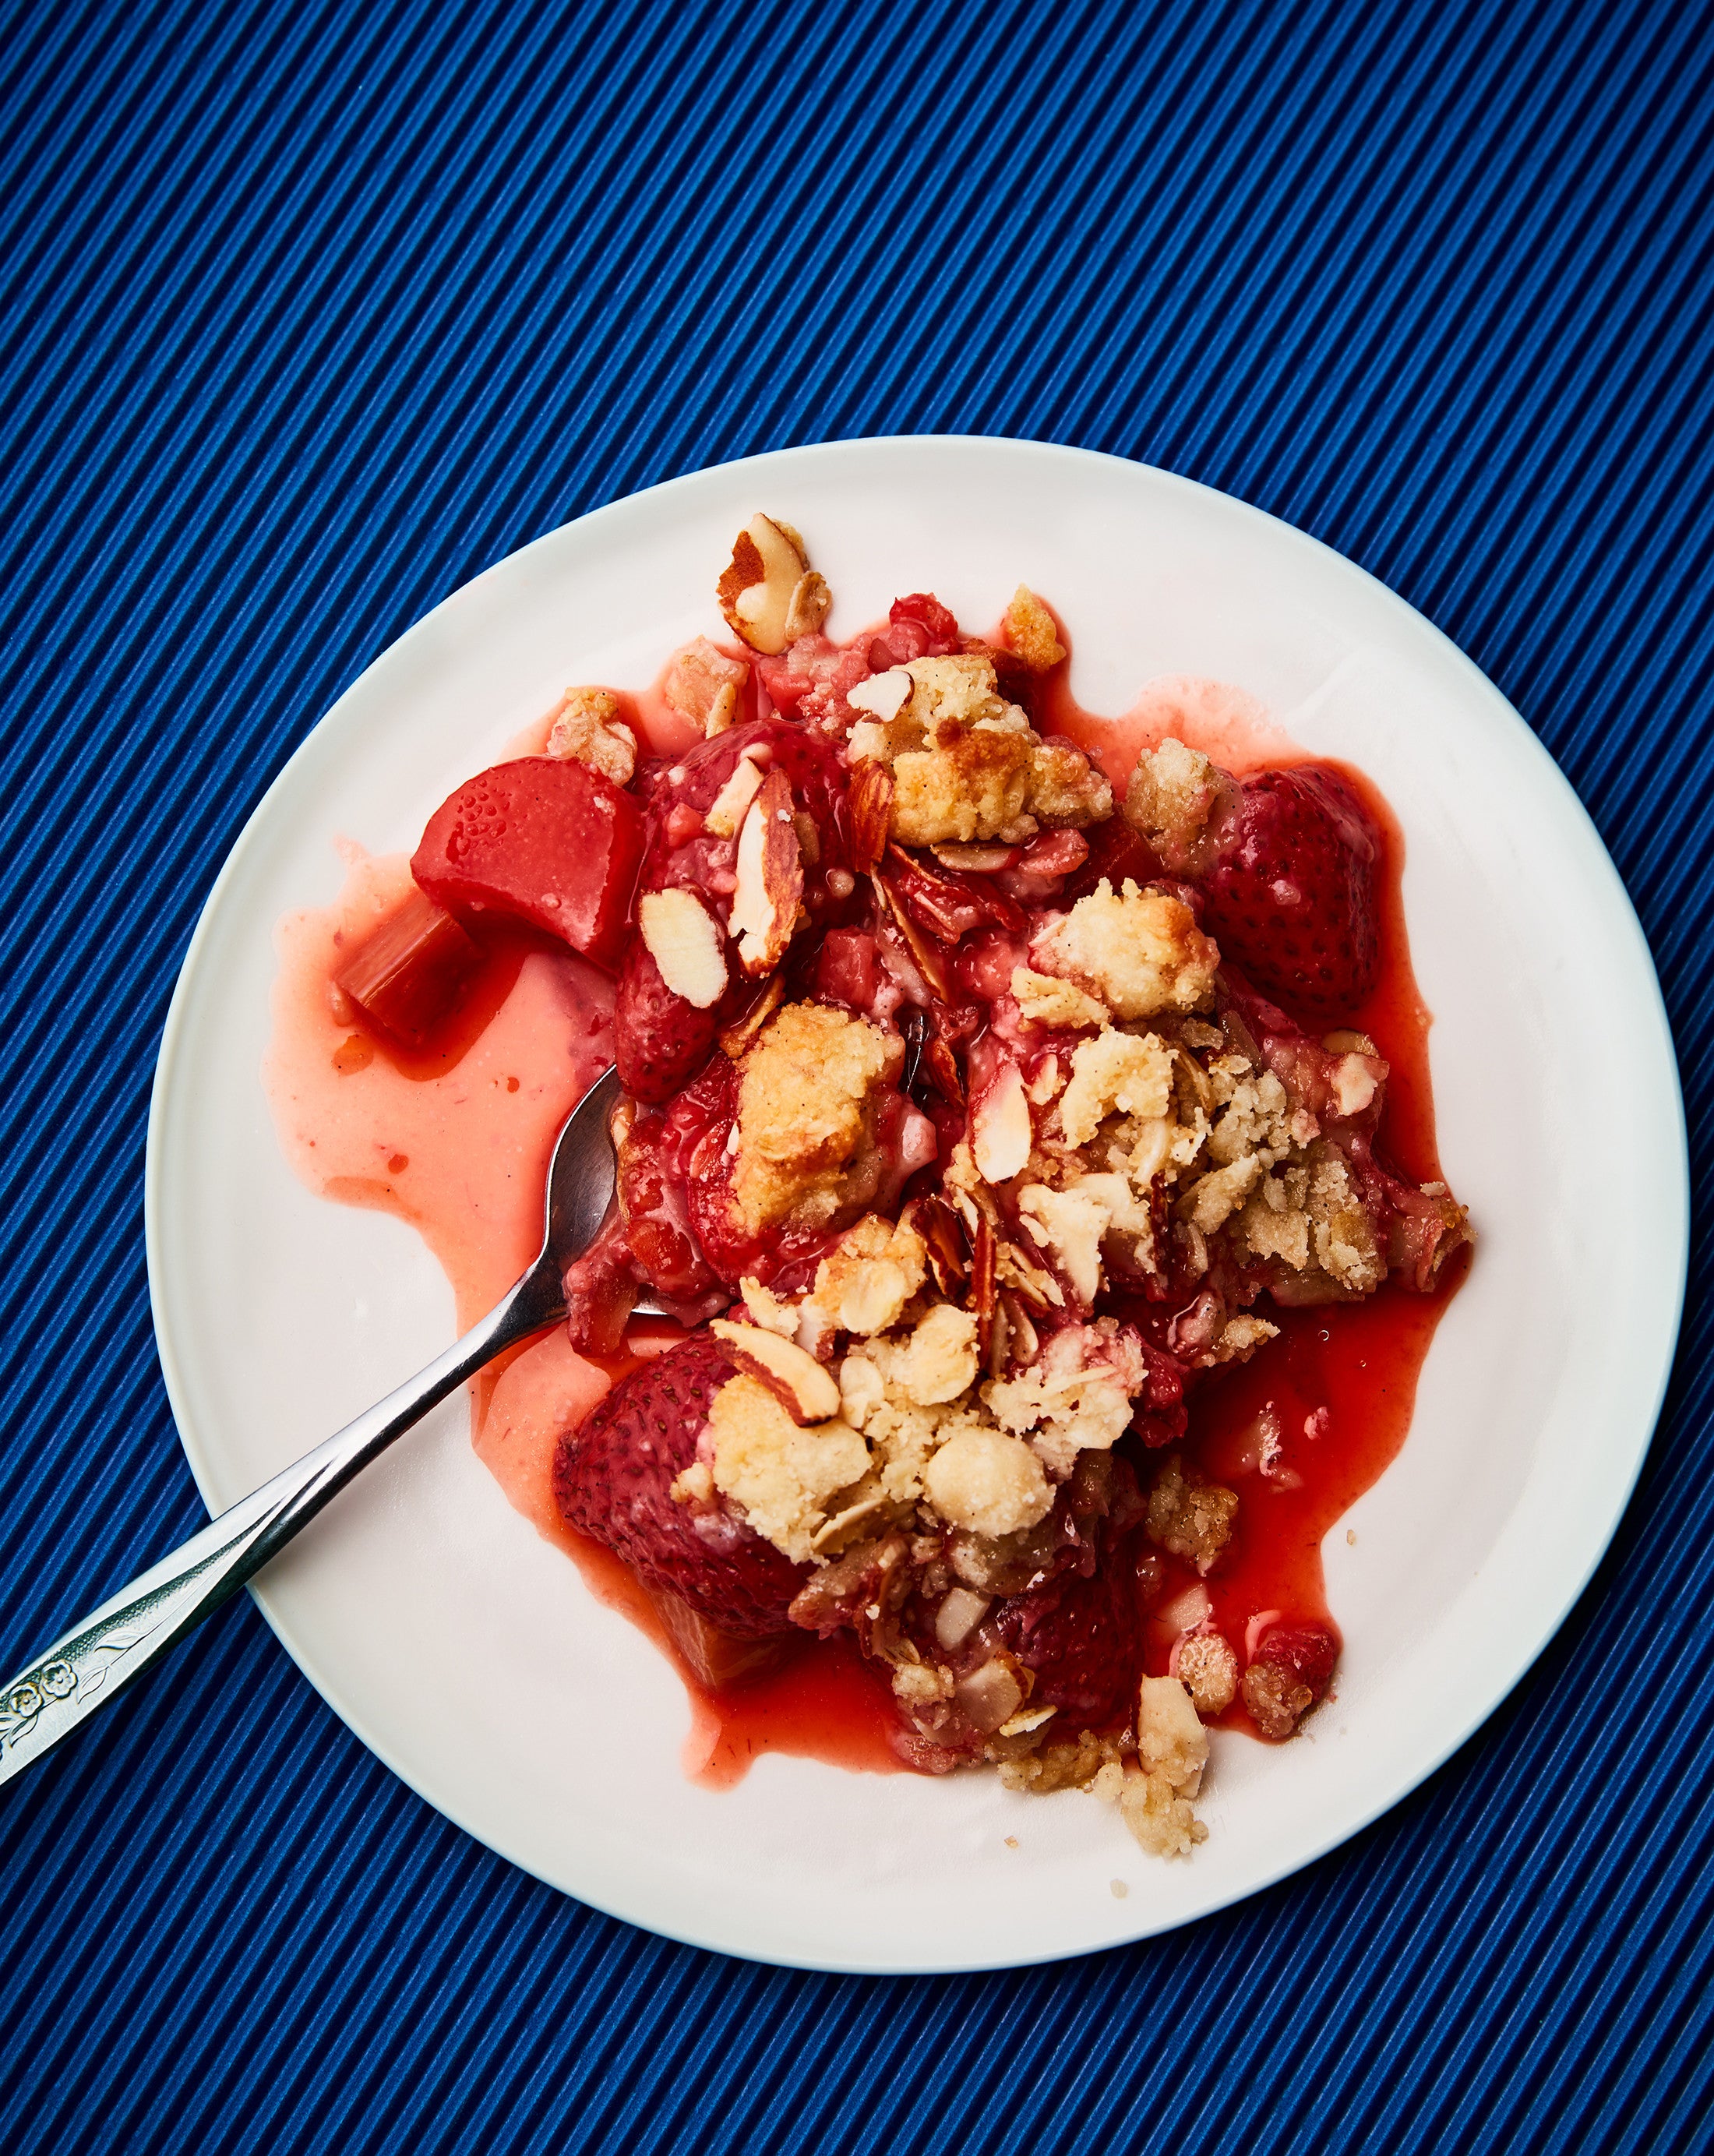
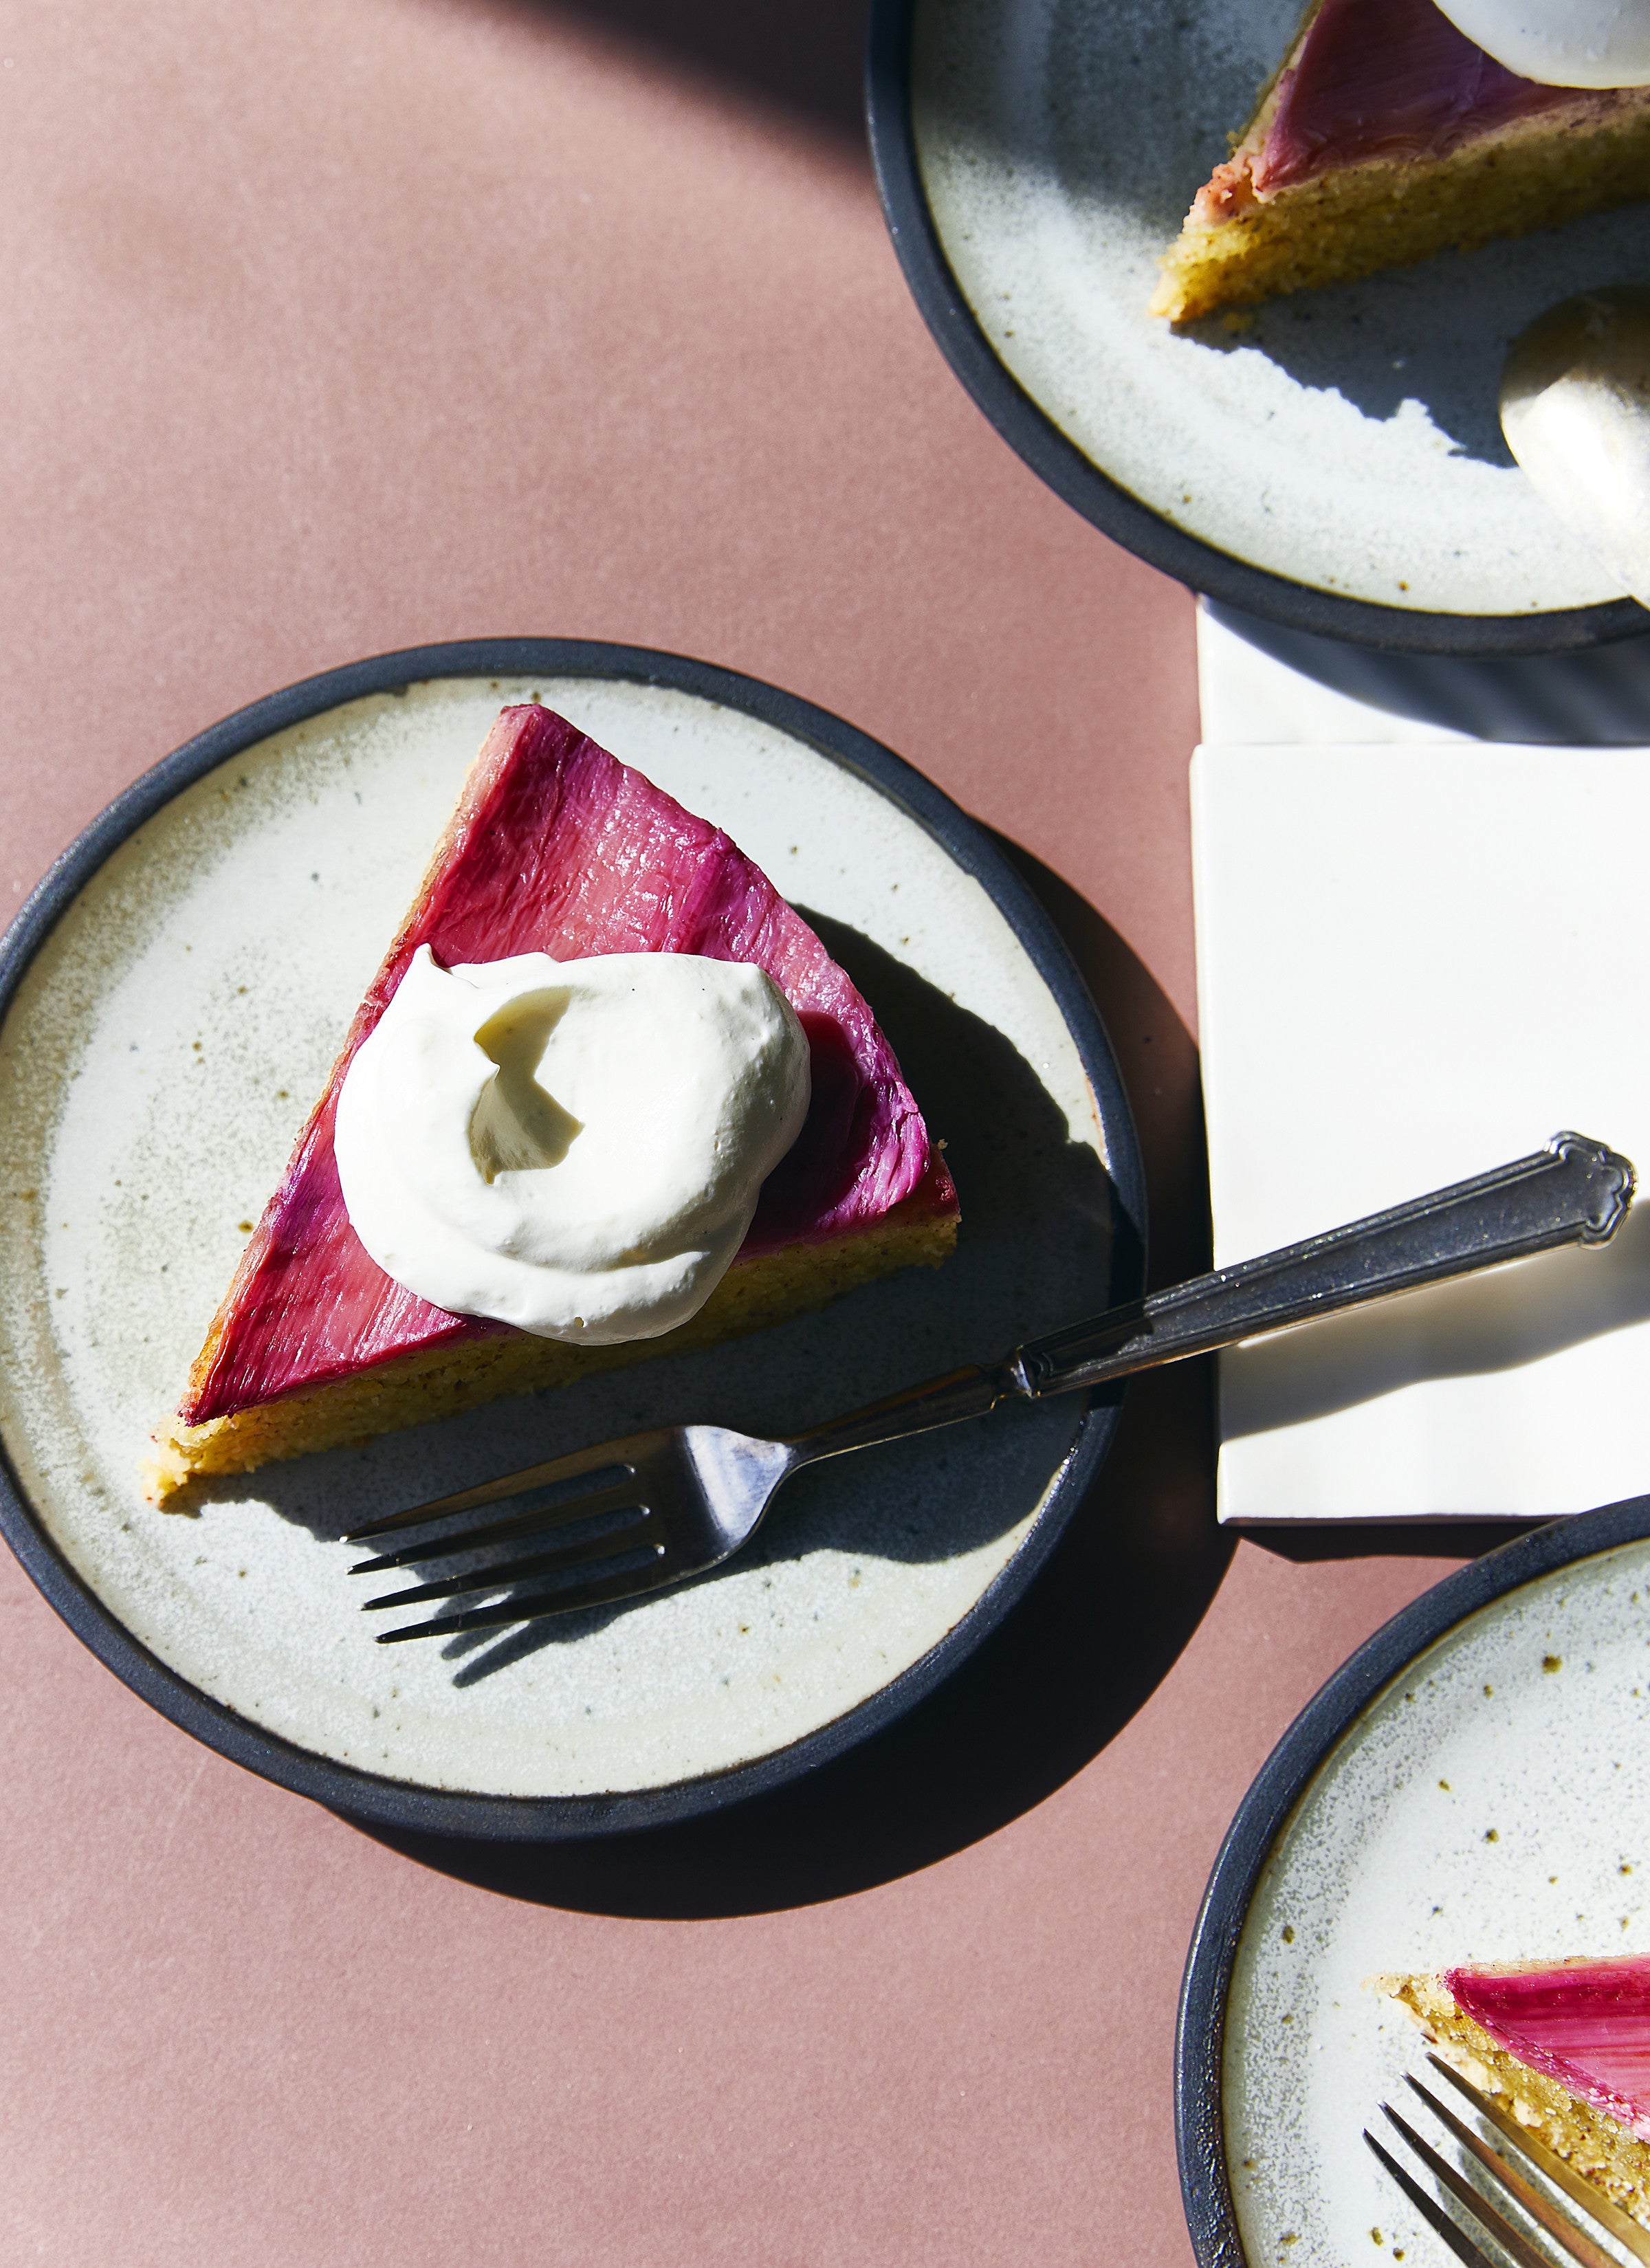
Strawberry Rhubarb Almond Crumble

First of many ALWAYS GOOD RECIPES— a recipe collaboration from Tara O'Brady & Nikole Herriott

In this strawberry-rhubarb beauty, the fuschia filling is snugly tucked underneath a streusel made with almond paste. Swapping in the paste for some of the butter makes for a topping that’s deeply flavoured, and substantial without heaviness. There’s oomph, but delicacy too. As a whole, the crumble is only modestly sweet, aromatic in a way that reminds of the spice of amaretto, and with a clear sourness, bright like summer sun.


CRUMBLE
205 g almond paste, sliced
115 g unsalted butter, cool room temperature, cubed
1 vanilla bean
1 tablespoon almond extract
2 teaspoons sea salt
140 g all purpose flour
60 g large flake (old-fashioned) oatmeal
30 g granulated sugar
100g sliced natural almonds
50 g turbinado sugar


FRUIT FILLING
880 g strawberries, halved or quartered, depending on size
680 g rhubarb, trimmed and sliced
1 lemon
1 tablespoon vanilla extract
85 g granulated sugar
30 g tapioca powder
Pinch of sea salt


Start with the crumble topping. Push the almond paste and butter into the bowl of a food processor with the metal blade in place. Split the vanilla bean down its length, then scrape the seeds into the processor (save the pod for another use). Add the almond extract and salt. Run the machine until the almond paste and butter are creamed and light, stopping the machine and scraping down the sides as needed, around 1 minute blending total.

Using a silicone spatula, spread the almond butter mixture thickly across a piece of clingfilm, forming a plump rectangle. Wrap tightly and refrigerate until quite cold, at least 2 hours.

Make the fruit filling. Tumble the strawberries and rhubarb into a large bowl. Squeeze the lemon juice over top, catching any seeds, then fold in the vanilla. Stir the sugar, tapioca, and salt together in a bowl, then sprinkle over the fruit. Fold again, then spoon into a 2-quart | 2 litre casserole, and set aside.

Preheat an oven to 350°F | 176°C, with a rack in the lower third. Once the almond butter is cold, unwrap and cut into large dice. Mix the flour, oats, and granulated sugar in a large bowl. Scatter the butter cubes across the bowl, tossing to coat. Then, using hands, work the butter into the dry mix, until clumps start to form. Tip in the almonds and continue to pinch and work the mixture, forming a rough landscape of craggy bits and finer pebbled shapes.


Scrunch the crumble mixture over the rhubarb and strawberries. Sprinkle with the turbinado sugar, and place the casserole on a parchment-lined baking sheet. Bake in the hot oven until the filling is bubbling and the topping is golden, 55 minutes or so. Cool on a baking rack for a few minutes before serving.


Notes:

      • Almond paste can be difficult to find in Canada; often times you’ll see marzipan instead, which is sweeter. Edde’s brand is a sort of almond paste/marzipan hybrid, only moderately sweet, and what we’d recommend here. For those in the States and elsewhere, Solo almond paste is brilliant. This recipe was also tested using it, with great results. With Solo, you may want to increase the granulated sugar by 25 g in the crumble mixture.


Photos: Michael Graydon + Nikole Herriott
Set Design: Julia Callon
Creative Direction: Herriott Grace

Herriott Grace Vanilla Rhubarb Pound Cake

Recently I arrived to the studio to find a surprise copy of Elisabeth Prueitt's, Tartine All Day and I knew immediately I'd bake from it. I chose a variation on her Lemon Pound Cake and made this Vanilla Rhubarb beauty. I've made it many times now (it's so delicious!) so I'm getting pretty good at rhubarb patterns (so satisfying!), but by far my favourite is the star. It's best done with a guide (I explain that a little lower down), plus there's a short stop motion to illustrate it as well. I'm sure this upside down cake would be wonderful with other fruit as well, I think I'll make it all summer long. :)
xo, N


VANILLA RHUBARB
POUND CAKE

Vanilla Rhubarb Pound Cake

Reprinted from TARTINE ALL DAY Modern Recipes for the Home Cook by Elisabeth Prueitt. Lorena Jones Books an Imprint of Ten Speed Press, 2017. 

[Find my optional notes highlighted in pink in square brackets.]
The actual recipe is called Lemon Pound Cake, (p 302) the rhubarb is listed as one of the variations (p 305). 

Makes 8 to 10 servings (one 10-inch/25cm cake) 
[I prefer one 9-inch springform pan, lightly greased & parchment lined. Bake it on a parchment lined baking tray with sides or a lip. Since you're using a springform pan the juice will otherwise seep out and make a huge mess of your oven. The cake will work in a regular greased cake pan, with and without parchment, I just like the results better from a greased and parchment lined springform.]

Unsalted butter, for the pan
Preheat the oven to 350˚F/180˚C
[I used only the weight measures
]

1/4 cup/50g granulated sugar
5 stalks rhubarb, trimmed
[I used about 8 stalks of greenhouse rhubarb before the outdoor was available, it's less robust during baking so depending on what you're using I'd suggest 5-8 stalks]

4 large eggs, at room temperature
2/3 cup/130g granulated sugar
1/4 tsp salt

1/2 cup/110g unsalted butter, at soft room temperature
2 Tbsp olive oil
[I prefer a more neutral oil in this case and used vegtable]
[1 vanilla bean, scraped]

1 Tbsp coconut flour
1/4 cup/60ml water

Finely grated zest of 1 lemon [I omitted this]
3 Tbsp/45ml fresh lemon juice [I omitted this]
1/4 tsp vanilla extract [I used 1 tsp]
1/4 tsp sea salt

3 cups/360g 
almond flour [I like a mix of natural & blanched]
1/4 cup/36g brown rice flour
1 tsp baking powder

1. Preheat the oven to 350˚F/180˚C. Lightly butter the bottom and sides of your cake pan. [Cut two 9" circles (1 for your guide, 1 for the bottom) and two 15x3" strips from parchment (for the sides), set aside. Fold one circle into quarters. This 1/4 circle will be your guide. Lightly butter the pan, 1 round and both strips of parchment, place the round and strips into the lightly greased pan.]


2. Evenly spread 1/4 cup (50g) granulated sugar over the bottom of the pan. Cut 5 stalks
[I used 8, give or take] and fill the pan in a pattern. (I like to to cut and fit the stalks in a star or chevron pattern but you could also lay them side by side.) Fit the rhubarb tightly into the bottom of the pan.

[Here's my process for fitting the rhubarb into the pan:
Place the 1/4 circle guide on a small cutting board. With a paring knife and starting from the centre of the 1/4, cut 2 pieces of rhubarb (flat side down) to fit beside one another with the point in the centre. Trim them to fit the guide exactly. Repeat this process from the centre to the edges of the 1/4 circle. Then, place these rhubarb strips into a 1/4 of the pan (once the sugar is already there). Repeat 4 times (it's helpful to choose pieces of rhubarb that are a similar width). I found I did have to do some re-trimming here and there and it turns out best if the edges are nice and rounded like the pan. Once all the rhubarb is in the pan, cut 2 diagonal lines (like 2 mountains) in each 1/4 (evenly spaced within that 1/4). I found it's easiest to cut from the outside in, on each 1/4, but it works both ways. Finally make 4 tiny rhubarb triangles to fit the 4 triangle spaces you'll be left with.

*You'll also end up with rhubarb scraps, I stewed these with sugar and vanilla bean and have been eating it by the spoonful ever since.]


2. Combine the eggs, sugar, and salt in a large bowl. Using electric beaters or a whisk, beat on high speed until the mixture lightens in colour and triples in volume, 2 to 3 minutes. Continue to beat at a medium speed for 1 more minute, until the air bubbles appear more uniform in size and the mixture forms satiny ribbons. 

3. In another bowl, use a wooden spoon to stir together the butter and olive oil. (The butter must be very soft for this to work properly.) [add the scraped contents of 1 vanilla bean]

4. In a small bowl, combine the coconut flour and water and then add to the butter and oil. 

5. Add the lemon zest and juice [omit], vanilla, and salt to the butter mixture. 

6. Stir together the almond flour, rice flour, and baking powder in a medium bowl. Gently fold the dry ingredients into the beaten egg mixture. Fold about one-quarter of the butter mixture into the egg mixture and then fold in the remaining three-quarters of the egg mixture. Spread the batter evenly over the rhubarb and bake until a cake tester inserted in the center comes out clean, 45-60 minutes. Let cool in the pan on a rack for 5 minutes and then invert onto a serving plate. 

The cake keeps, tightly wrapped, for up to 3 days at room temperature or 2 week in the refrigerator. [I love it served with vanilla scented chantilly cream]


Herriott Grace Rhubarb Vanilla Pound Cake

Photos: Michael Graydon + Nikole Herriott
From the HG Shop in this post: Ash + Stoneware plates, Favourite Board (in the video) & Indigo Earthenware Bowl (also in the video).

Herriott Grace Cherry Crumble

I first made this recipe it was on a whim, with cherries I had in the freezer from the summertime and it turned out really lovely. Since I've made it quite a few times with store bought and the result has been great as well! I love the combination of cherries and cardamom and that tiny bit of oatmeal that makes it feel healthy. ;) It also fits perfectly in our medium sized casseroles

Cherry Pistachio Crumble 

Reprinted from Epicurious, originally published in Self, August 2012 by Zoe Singer.

[I don't use a food processor, instead I prefer to break up the pistachios in a mortar & pestle and make the crumble by hand, tossing them in at the end. It also works well to use room temperature butter instead of melted and instead mixing it by hand. The food processor is not necessary here.]

Unsalted butter for greasing pan
5 cups pitted cherries (2 pounds whole or 1 1/2 pounds pitted), thawed if frozen
1/2 cup plus 1 tablespoon light brown sugar, divided
1 tablespoon fresh lemon juice
1/3 cup plus 1 tablespoon all-purpose flour, divided
1/2 cup shelled, unsalted pistachios
1/3 cup rolled oats
4 walnuts, shelled
1/4 teaspoon ground cardamom
1/4 teaspoon salt
4 tablespoon unsalted butter, melted

Heat oven to 350°F. Butter a 9" pie pan. In pan, mix cherries with 1 tablespoon sugar, juice and 1 tablespoon flour. In a food processor, pulse remaining 1/2 cup sugar, remaining 1/3 cup flour, pistachios, oats, walnuts, cardamom and salt until nuts are finely chopped, 1 to 2 minutes. Stir in butter; sprinkle topping over cherries. Bake until juices bubble thickly and topping is browned, 25 minutes. Serve warm or at room temperature.


From the HG Shop in this post:
Workaday Casseroles
Stoneware + Porcelain Half Pasta Bowl

    Tara's Cookies

    Perfect for road trips and for sending in the mail these are some of my favourite cookies ever. If you haven't made them, the recipe is by the amazing Tara O'Brady and you should! You can find another of my faves from this series here.

    xo, N

    Herriott Grace


    Chocolate Chip Cookies

    Reprinted with permission from SEVEN SPOONS My Favorite Recipes for Any and Every Day by Tara O'Brady. Appetite by Random House, Canada, 2015. [my optional notes in square brackets]


    1 cup (225 g) unsalted butter, chopped
    3 1/4 cup (415 g) all-purpose flour
    1 1/4 teaspoons baking powder
    1 teaspoon baking soda
    1 1/2 teaspoons medium-grain kosher salt
    1 1/2 cups (320 g) packed light brown sugar
    1/2 cup (100 g) granulated sugar
    2 eggs
    2 teaspoons vanilla
    12 ounces (340 g) semisweet or bittersweet chocolate, chopped [I use 240 g]
    Flaky sea salt for sprinkling (optional)

    Preheat an oven to 360˚F (180˚C). Line 2 heavy baking sheets or sheet pans with parchment paper.

    [I use the weight measurements.]

    In a medium saucepan over the lowest heat possible, melt the butter. There should be no sizzle, no crackling, or pops; let the butter ooze into liquid, without boiling, so minimal moisture is lost. Stir regularly, until the butter is almost completely melted. (this is a good time to chop the chocolate.)

    In a bowl, whisk together the flour, baking powder, baking soda, and kosher salt. Set aside.

    Pour the melted butter into a large bowl and whisk in the sugars. The mixture may look like it will seize, but it will relax with a few seconds of stirring. Add the eggs, one at a time, whisking briskly after each addition, but only to combine. Stir in the vanilla. Use a wooden spoon or silicone spatula to stir in the dry ingredients. Once mostly blended, fold the chocolate into the dough until the remaining flour is incorporated, and the dough no longer looks dusty. Bring any stray ingredients up from the bottom of the bowl but do not over mix.

    If the dough seems warm or looks overly glossy, refrigerate for 5 minutes. Then roll into balls using 3 tablespoons of dough for each. [I use a disher] Arrange on the prepared pans, leaving 3 inches (7.5 cm) in between each. Sprinkle with sea salt. Bake until the tops are cracked and lightly golden, yet the cookies are still soft at the centre, 10 to 12 minutes, rotating the pan halfway through cooking. Leave the cookies on the sheet pan for 2 minutes, then transfer to a wire rack to cool. Continue shaping and baking cookies with the remaining dough, making sure to use a cold sheet pan for each batch.

    The cookies can be kept at room temperature in an airtight container for up to a 1 week.


    From the HG Shop in this post:
    Handmade Porcelain Platters

    I love crème caramel for its simple perfection. Its just-held-together texture and its pretty shine when turned out of the mold. I also love that Mimi included a recipe for it in her beautiful new book, French Country Cooking and that that recipe is one her grandmother used to make. I can imagine her making it in a small kitchen in a picturesque village in the south of France. Perfect.
    xo, N

    Herriott Grace


    Crème Caramel

    Reprinted from FRENCH COUNTRY COOKING Meals and Moments from A Village In The Vineyards by Mimi Thorisson. Clarkson Potter Publishers, NYC, 2016. [my optional notes in square brackets]

    Crème brûlée is just as iconic and equally famous in world of French sweets but there is something distinctly old-fashioned about crème caramel. I will always associate this dessert with my sweet little grandmother Sérphine, who made it every Sunday in the South of France. This is her recipe, which I've made again and again until I figured out any pitfalls and perfected it. Now I can make Crème Caramel that does justice to my grandmother, and so can you.

    Herriott Grace  

    FOR THE CARAMEL
    1 cup / 200 g sugar

    FOR THE CUSTARD
    1 cup / 240 ml heavy cream [I substitute 10% cream]
    1 cup / 240 ml whole milk [I substitute 10% cream]
    1 vanilla bean, split lengthwise, seeds scraped and reserved
    1 teaspoon lemon zest [optional]
    pinch of fine sea salt
    4 large eggs
    1/4 cup / 50 g castor sugar


    1. Have ready an 8-inch / 20 cm fluted brioche mold or other decorative ovenproof mold. [I've made with both 1 tin or 8 individual tins, I especially like using straight sided loaf tins, pictured in 1st 2 photos.]

    2. MAKE THE CARAMEL. In a medium saucepan, melt the sugar over medium heat without stirring. Once the sugar has dissolved, boil until the color turns uniformly dark amber. Remove immediately from the heat and carefully pour it into the mold. Swirl the mold in a circular motion so the caramel coats the entire bottom. Once the caramel is cool, butter the sides of the pan (this will facilitate the unmolding later). [If you're new to making caramel for crème caramel, here's a great video from MSL with good tips. And some more from BA here.]

    3. Preheat the oven to 300˚F / 150˚C. Bring a kettle of water to the boil.

    4. MAKE THE CUSTARD. In a large saucepan, combine the cream, milk, [or 10% cream] vanilla bean and seeds, lemon zest, and salt over medium hear until hot but not boiling.

    5. In a large bowl, whisk together the eggs and sugar until pale and fluffy. When the milk is hot but not boiling, discard the vanilla pod and slowly whisk the liquid into the egg mixture. [Strain mixture through a fine sieve]. Gently pour mixture into the mold. [I do this once the mold is in the baking dish.]

    6. Set the mold in a roasting pan or deep baking dish. [Set the roasting pan on the middle rack in your prepared oven.] Gently pour boiling water into the roasting pan to come halfway up the sides of the mold. Bake until the custard is set in the centre, about 50 minutes. Remove from the water bath and let cool completely. Refrigerate for at least 1 hour, until cooled. 


    7. To serve, gently loosen the sides of the custard with a butter knife. Invert a rimmed serving dish (make sure it is deep enough to hold the caramel sauce) on top and gently turn everything upside down. Remove the mold. Serve each portion with a few spoons of caramel sauce.


    Herriott Grace

    From the HG Shop:
    Porcelain Dessert Platters (which are also available as plates!)
    Photos: Nikole Herriott